
Valentine’s Day is the perfect time for fancy dinnerware and accessories, so there is better time to DIY Napkin holder for your table!
Older kids can help Mum with this Valentine’s Day craft, although be careful with the hot glue gun! One of my most favorite DIY Valentines Decorations this year!!
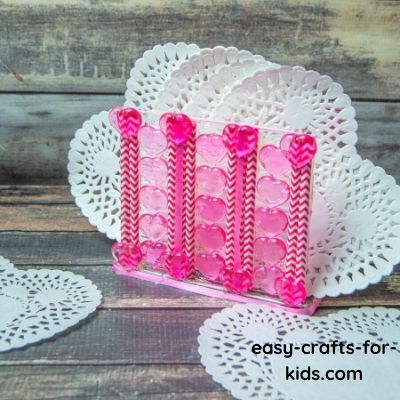
DIY Valentines Table Decoration
The best thing about this Valentine’s Day craft for kids is that most of the items come from The Dollar Store, although you would not believe it when you see the final outcome! I have previously used supplies from here for my Love Bug Clay Pot Craft.
My little girl is 4 years old and loves tea parties with her friends! These pink napkin holders would be right up their street! We all know how little girls love all things pink!
Her Birthday is not until the Summer but we can make this for Valentine’s Day and then keep them good for July, when her friends visit for cupcakes and scones!
Before you go any further I would love you to see even more of my cute Valentine crafts for kids this year.
Cute Pink Valentine day Napkin Holder craft for kids with Mum helping out! STEP 1 Gather all your materials in front of you so that you have everything to hand. STEP 2 First, line straws up with the napkin holder and cut to measure vertically. STEP 3 Start off by glueing two straws side-by-side, then glue 5 hearts up-and-down vertically. Next to that, glue 3 more straws. STEP 4. Add 5 more hearts next to that. Now glue 3 more straws next to that, 5 more hearts and finally 2 more straws to finish. STEP 5 Flip over and do the other side. The straws will be shorter on this side, but that’s ok. STEP 6 Measure and cut a piece of ribbon to fit the middle straw of each set of 3 side-by-side straws in the center of each side of the napkin holder. Glue ribbon around the bottom edge of the napkin holder, snipping and gluing the edge. STEP 7 Add plastic hearts to the top and bottom of each set of straws. To give it a more finished look, add another piece of ribbon across the top of the straws so you don’t see the holes. *When you cut the straws to fit the napkin holder, each straw won’t be cut exactly in half due to the length of the napkin holder. They will be longer than half. So, in order to utilize the straws to get the most coverage, your best bet is to cut all 18 straws to the height of the napkin holder, then use 2 of the shorter remaining pieces at each end of one side of the napkin holder. As per usual I have broken this down into a step by step craft and added images to make this easier for you to all follow. Kids can help with this Valentine craft by lining things up and handing over materials as you need them. Just be careful with the hot glue gun. You can make other napkin holders too following these instructions. How about switching the hearts to shamrocks for St Patrick's Day napkin holders. You would just need to change the color of the straws to white and green, and the curling ribbon to green also!
DIY Napkin Holder for Valentine's Day
Materials
Tools
Instructions


Notes
Thanksgiving Napkin Rings – dress up your napkins for this special celebration
Santa Napkin Rings – Christmas is the perfect time to dress up your napkins!
Watermelon Dinnerware Crafts – decorate your dinnerplate and drinking cup
Citrus Themed Summer Dinnerware – some fruit themed paper plate crafts for kids
Do you like this DIY Napkin Holder Craft for Valentine’s Day?


Hi there, I’m Laura an avid kids crafter with two little ones of my own to keep entertained! I have been doing kids crafts since 2018! Here at Easy Crafts for Kids you can find seasonal crafts for all age groups, as well as drawing tutorials, coloring pages and some other fun printables!